http://www.ittoday.co.kr/news/articleView.html?idxno=13499
아이폰 앱 개발 무료 동영상 강좌.
http://www.appsnext.com/
앱 개발자들 참고.
2010년 5월 17일 월요일
2010년 5월 11일 화요일
Bash Shell 프로그래밍
Shell
사용자와 운영체제 사이에 존재하여 사용자의 명령을 운영체제가 이해하도록 하고, 사용자 명령의 실행 결과를 사용자에게 보여주는 사용자 인터페이스
Steven Bourne이 개발한 Bourne Shell(sh)가 최초의 Shell 이다.
Bash Shell
1988년 1월 10일 Brian Fox가 개발
GNU 시스템의 표준 Shell로 자리 잡았고 그 후 거의 모든 유닉스에서 사용됨
1989년 Chet Ramey가 합류하여 곧 공식적으로 bash의 유지보수를 맡게 되었다.
Sh Shell의 기본기능에 csh와 ksh의 장점을 합하여 bash가 탄생하였다.
Bash 기본 설정 파일
.profile : sh의 설정파일
대부분의 환경 설정이 이루어 지며 사용자가 시스템에 로그인할 때마다 실행된다.
.bash_profile : bash의 .profile
.bashrc : 서브Shell이 실행될 때 읽는다.
서브 Shell이란 로그인Shell에서 다시 bash가 실행되는 경우이다.
Shell script
Script : Shell 명령어들을 담고 있는 파일로 Shell Program이라고도 부른다.
.bash_profile, .bashrc 등은 모두 script이다.
문법
변수
처음 사용될 때 만들어진다. 즉, 미리 선언할 필요가 없다.
유닉스 명령과 마찬가지로 대소문자 구별이 있다.
기본적으로 데이터를 문자열로 저장한다. 수치를 입력해도 문자열로 저장한다.
계산이 필요한 경우에는 자동으로 수치로 변환하여 계산 후 다시 문자열로 저장된다.
변수의 값을 사용할 때는 변수 명 앞에 “$”를 붙여서 사용한다.
foo=”동영상은 tv팟” - 입력
echo $foo - 입력
동영상은 tv팟 - 출력결과 주의! 변수에 값 입력시 ! 가 들어갈시에는 작은따옴표(‘test’)로 입력한다.
환경변수
Shell을 기동하고 나면 기복적으로 셋팅 되어 있는 변수. 필요한 경우 일반변수처럼 값을 얻어오거나 셋팅 할 수 있다.
$0 – 실행된 쉘 스크립트 이름 b. $# - 스크립트에 넘겨진 인자의 개수 c. $$ - 쉘 스크립트의 프로세스 ID
인자변수
쉘 스크립트에 인자를 넘겨줄 때 그 인자들에 대한 정보를 가지고 있는 변수이다.
$1 ~ $nnn – 넘겨진 인자들 b. $* - 스크립트에 전달된 인자들을 모아놓은 문자열 하나의 변수에 저장되며 IFS 환경변수의 첫번째 문자로 구분된다. c. $@ - $*와 같은 기능이지만 구분자가 IFS변수의 영향을 받지 않는다.
예제
-> ./vi test2.sh
echo "This Script Executable File : $0"
echo "Argument Count : $#"
echo "Process ID : $$"
echo "Argument List \$* : $*"
echo "Argument List \$@ : $@"
echo "Argument 1 : $1"
echo "Argument 2 : $2"
-> ./sh test.sh a b
This Script Executable File : ./test2.sh
Argument Count : 2
Process ID : 9308
Argument List $* : a b
Argument List $@ : a b
Argument 1 : a
Argument 2 : b
함수
함수는 스크립트 안의 스크립트이다 (a script-within-a-script)
함수는 쉘의 메모리에 저장되고, 실행 속도가 빠르다
declare –F 명령어로 현재 자신의 로그인 세션에 정의되어 있는 함수들을 알 수 있다.
명령어 우선순위
Alias (alias ls=’ls –l’) b. 예약어 (function, if , for, ….) c. 함수 d. bunlt-ins like cd and type e. 스크립트, 프로그램
함수 정의 방법
bash
function testfunc {
echo "test"
}
sh
testfunc() {
echo "test"
}
예제)
val1=$1
val2=$2
function testfunc {
echo "동영상은 tv팟"
echo $val1
echo $val2
}
testfunc
}
String 연산자
${varname:-word} : varname이 존재하고 null이 아니면 그 값을 리턴, 아니면 word리턴
${varname:=word} : varname이 존재하고 null이 아니면 그 값을 리턴, 아니면 varname에 word를 대입
${varname:?message} : varname이 존재하고 null이 아니면 그 값을 리턴, 아니면 varname을 출력하고 message를 출력
${varname:+word} : varname이 존재하고 null이 아니면 word를 리턴 아니면 null을 리턴
${varname:offset:leng(없으면 varname의 length)} : varname=daum tvpot이면 ${varname:4}의 값은 tvpot, ${varname:5:2}의 값은 tv
pattern and pattern matching
${#valiable} : valiable의 길이를 가져온다
${variable#pattern} : pattern이 variable의 앞부분이 일치하면 가장 짧은 부분을 제거하고 나머지를 리턴
${variable##pattern} : pattern이 variable의 앞부분과 일치하면 가장 긴 부분을 제거하고나머지를 리턴
${variable%pattern} : pattern이 variable의 뒷부분과 일치하면 가장 짧은 부분을 제거하고나머지를 리턴
${variable%%pattern} : pattern이 variable의 뒷부분과 일치하면 가장 긴 부분을 제거하고나머지를 리턴
${variable/pattern/string} : 일치하는 가장 긴 부분을 string으로 대체. 한번만 일어남
${variable//pattern/string} : 일치하는 가장 긴 부분을 string으로 대체. 모두 일어남
조건문
if / else
문법
if condition
then
statements
elif condition
then
statements
else
statements
fi
값 비교절
[ string ] - string이 빈 문자열이 아니라면 참
[ string1 = string2 ] - 두 문자열이 같다면 참 or string1 matches string2
[ string1 != string2 ] - 두 문자열이 다르면 참 or string1 does not match string2
[ -n string ] - 문자열이 null(빈 문자열) 이 아니라면 참
[ -z string ] - 문자열이 null(빈 문자열) 이라면 참
[ expr1 -lt expr2 ] – exp2가 exp1보다 크면 참 (‘Less than')
[ expr1 -le expr2 ] – exp2가 exp1보다 크거나 같다면 참 (‘Less than or equal')
[ expr1 -eq expr2 ] - 두 표현식 값이 같다면 참 (‘EQual')
[ expr1 -ne expr2 ] - 두 표현식 갑이 같지 않다면 참 ('Not Equal')
[ expr1 -gt expr2 ] - expr1 > expr2 이면 참 ('Greater Then')
[ expr1 -ge expr2 ] - expr1 >= expr2 이면 참 ('Greater Equal')
[ expr1 -ne expr2 ] - expr1 != expr2 이면 참 ('Not Equal')
[ ! expr ] - expr 이 참이면 거짓, 거짓이면 참
[ expr1 -a expr2 ] - expr1 AND expr2 의 결과 (둘다 참이면 참, 'And')
[ expr1 -o expr2 ] - expr1 OR expr2 의 결과 (둘중 하나만 참이면 참, 'Or')
파일관련 비교절
[ -d FILE ] - FILE 이 디렉토리이면 참
[ -e FILE ] - FILE 이 존재하면 참
[ -f FILE ] - FILE 이 존재하고 정규파일이면 참
[ -r FILE ] – 파일 읽을 권한이 있다면 참
[ -s FILE ] – 파일이 있고 빈파일 아니라면 참
[ -w FILE ] – 파일 쓰기 권한이 있다면 참
[ -x FILE ] – 실행권한이 있다면 참
[ -O FILE ] – 파일의 주인(?)이라면 참
[ -G FILE ] – 파일의 group ID와 사용자의 group ID가 같다면 참
[ FILE1 -nt F - : FILE1이 FILE2 보다 새로운 파일이면 ( 최근파일이면 ) 참
[ FILE1 -ot F - : FILE1이 FILE2 보다 오래된 파일이면 참
case
문법
case 변수 in
pattern 1 )
statements ;;
pattern 2 )
statements ;;
* )
statements ;;
esac
select
문법
select name [in list]
do
statements that can use $name …
done
Building a 5 Star Rating System with jQuery, AJAX and PHP
Building a 5 Star Rating System with jQuery, AJAX and PHP: "


 "
"
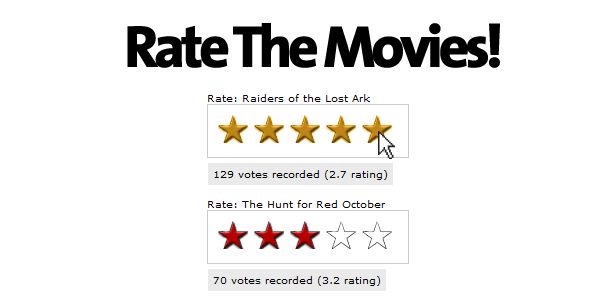
In this tutorial, you’ll learn how to build a rating system with AJAX, PHP, and jQuery. Votes will be recorded and updated in real-time with the magic of AJAX, and we’ll also leverage the power of PHP so that you don’t even need a database!
Step 1. Building the HTML
We’re going to create a simple page that lists two movies, and allows you to rate them. This means we need the stars to show the current rating, and to allow voting. We also want an area to show the total votes cast, and the current rating down to one decimal place.
Let’s take a look at the HTML/CSS
       <div class='movie_choice'>
           Rate: Raiders of the Lost Ark
           <div id="r1" class="rate_widget">
               <div class="star_1 ratings_stars"></div>
               <div class="star_2 ratings_stars"></div>
               <div class="star_3 ratings_stars"></div>
               <div class="star_4 ratings_stars"></div>
               <div class="star_5 ratings_stars"></div>
               <div class="total_votes">vote data</div>
           </div>
       </div>

       <div class='movie_choice'>
           Rate: The Hunt for Red October
           <div id="r2" class="rate_widget">
               <div class="star_1 ratings_stars"></div>
               <div class="star_2 ratings_stars"></div>
               <div class="star_3 ratings_stars"></div>
               <div class="star_4 ratings_stars"></div>
               <div class="star_5 ratings_stars"></div>
               <div class="total_votes">vote data</div>
           </div>
       </div>
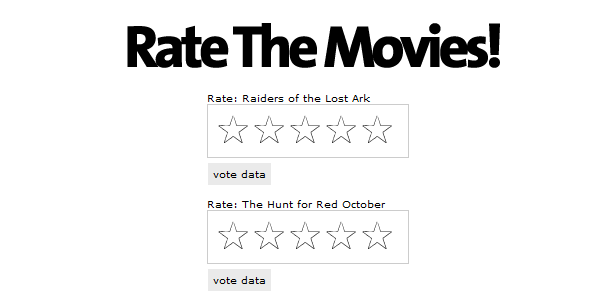
Notice how there are no graphics in this HTML? They’ll be added with CSS. We’re just using the HTML to create the framework that the widget works from. Now it’s time to start adding CSS.
       .rate_widget {
           border:     1px solid #CCC;
           overflow:   visible;
           padding:    10px;
           position:   relative;
           width:      180px;
           height:     32px;
       }
       .ratings_stars {
           background: url('star_empty.png') no-repeat;
           float:      left;
           height:     28px;
           padding:    2px;
           width:      32px;
       }
       .ratings_vote {
           background: url('star_full.png') no-repeat;
       }
       .ratings_over {
           background: url('star_highlight.png') no-repeat;
       }
This first part of the CSS accomplishes a few things:
- Gives the default ‘empty’ start to each star location
- Sets up classes for filled in stars, and highlighted stars
- Defines and styles the stars’ container.
You can either use the graphics provided in the download, or make your own. There needs to be a graphic for each of the three states: empty, full, and highlighted.
Next we add a little more CSS to position the total votes box, and center the widgets so the page matches the graphic at the start of this section.
       .total_votes {
           background: #eaeaea;
           top: 58px;
           left: 0;
           padding: 5px;
           position:   absolute;
       }
       .movie_choice {
           font: 10px verdana, sans-serif;
           margin: 0 auto 40px auto;
           width: 180px;
       }
Step 2. Adding the UI Interactivity
At this point, we have a very plain looking bunch of empty stars, but they don’t do a whole lot at this point. This is where jQuery comes to the rescue.
Our first step is to add mouseover and mouseout handlers for the stars. We need to highlight the star the mouse is over, and all the preceding stars.
       $('.ratings_stars').hover(
           // Handles the mouseover
           function() {
               $(this).prevAll().andSelf().addClass('ratings_over');
               $(this).nextAll().removeClass('ratings_vote');
           },
           // Handles the mouseout
           function() {
               $(this).prevAll().andSelf().removeClass('ratings_over');
               set_votes($(this).parent());
           }
       );
We’re taking advantage of jQuery’s powerful .prevAll() and .nextAll() methods to get the stars preceding and following the currently moused over star.
The code above then adds and removes the classes to make the stars under the mouse and before ‘highlighted’, and the stars after ‘not highlighted’.
What about set_votes() ?
This is a function that checks which stars should be in the ‘full’ state, and ties in closely with the next step, where we grab remote data from the server.
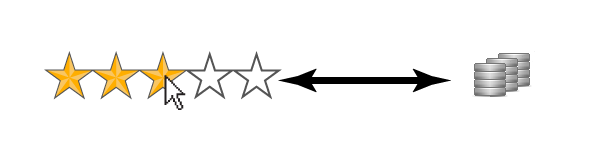
Step 3. Retrieving Data from the Server
Our stars highlight when you move the mouse over them, and that’s a great start. But what about the red stars showing the current vote? To reach this step, we need to both get the information from the server, and write some JavaScript to handle that data.
       $('.rate_widget').each(function(i) {
           var widget = this;
           var out_data = {
               widget_id : $(widget).attr('id'),
               fetch: 1
           };
           $.post(
               'ratings.php',
               out_data,
               function(INFO) {
                   $(widget).data( 'fsr', INFO );
                   set_votes(widget);
               },
               'json'
           );
       });
This code block – actually all the JavaScript – goes in a document.ready block. This particular code executes right away. It queries the server and gets some information on every vote widget on the page.
First we set up an object, out_data, to contain the information we’re sending to the server. Our PHP script expects to see ‘fetch’ when just grabbing data, so we include it here. We also include the ID of the widget, which lets the server-side script know what data we’re after. When the call back function fires, it contains a JavaScript object that looks like this:
       {
           'widget_id'     : 'r1',
           'number_votes'  : 129,
           'total_points'  : 344,
           'dec_avg'       : 2.7,
           'whole_avg'     : 3
       }
The .data() method is a bit of jQuery magic that allows you to associate arbitrary data with a DOM
object.
If you look closely at the code, you’ll see we’re taking that object (stored in the variable INFO) and
doing something with it via the .data() method.
The .data() method is a bit of jQuery magic that allows you to associate arbitrary data with a DOM
object. In this case, we’re storing the data in the widget div. It can be accessed later like this:
$('#one_of_your_widgets).data('fsr').widget_id;
set_votes(), Finally.
After the data has been returned from the server, its handed off indirectly to set_votes().
       function set_votes(widget) {

           var avg = $(widget).data('fsr').whole_avg;
           var votes = $(widget).data('fsr').number_votes;
           var exact = $(widget).data('fsr').dec_avg;

           $(widget).find('.star_' + avg).prevAll().andSelf().addClass('ratings_vote');
           $(widget).find('.star_' + avg).nextAll().removeClass('ratings_vote');
           $(widget).find('.total_votes').text( votes + ' votes recorded (' + exact + ' rating)' );
       }
The first three lines are for readability, as those variable names are pretty long. So let’s take a look at what’s happening here.
Line 7: ‘avg’ is a whole number, representing the rounded vote average of this widget. Because it’s
a number 1-5, we can use it to find the proper star in the widget, and turn it, and the
preceding ones to our ‘filled’ graphic. Notice the use of .andSelf() to include the star that
we’ve selected.
Line 8: This is quite similar to line seven, but we’re removing the filled graphic from later stars. This
is necessary in case the average for this widget has gone down since the last vote.
Line 9: Here we’re updating the grey box underneath the widget, which shows a more precise rating,
and lets a visitor know how many votes have been cast.
Step 4. Let the Voting Begin
The final step for the UI is to enable voting. We’re going to add a click handler to each of the stars. This click handler will be responsible for sending the vote data to the server.
Here’s the click handler:
       $('.ratings_stars').bind('click', function() {
           var star = this;
           var widget = $(this).parent();

           var clicked_data = {
               clicked_on : $(star).attr('class'),
               widget_id : widget.attr('id')
           };
           $.post(
               'ratings.php',
               clicked_data,
               function(INFO) {
                   widget.data( 'fsr', INFO );
                   set_votes(widget);
               },
               'json'
           );
       });
In this code block, we start out by creating some variables not only for clarity, but, in this case, so they can be used within the .post callback. Remember the click handler is assigned to the stars, so we also need that second variable, widget, to have the object containing the data.
First, we set up our outgoing data, which we place in the object clicked_data. We grab the class which includes a class name in the format of star_# telling us what vote is being given, and prepare to send that to the server, along with the widget’s ID.
The widget ID is the corner stone that this voting system relies on. It allows us to look up our stored data, and to easily show that data to the visitor.
Finally, on line line, we send this information to the server. The server will add the vote to the current totals, and send information back to the browser containing the updated data. The values displayed by the widget are then updated with set_votes().
Step 5. PHP: Creating the Class
Now that the UI is finished, we need to create a server side script to store and retrieve voting data.
We’re going to create a very simple class in PHP, called ‘Ratings,’ and use it to handle server requests for our rating system. There are only going to be two methods, plus the invocation. The use of our class will look like so:
       # New Object
       $rating = new ratings($_POST['widget_id']);

       # either return ratings, or process a vote
       isset($_POST['fetch']) ? $rating->get_ratings() : $rating->vote();
If you go back to section four, you’ll see we load the data with the variable ‘fetch’ set – that’s what we’re looking for here on line five. If its not set, then we’re processing a vote.
The first thing we’re going to look at is the begining of the class, and, more specifically, the constructor.
       class ratings {

           private $data_file = './ratings.data.txt';
           private $widget_id;
           private $data = array();

       function __construct($wid) {

           $this->widget_id = $wid;

           $all = file_get_contents($this->data_file);

           if($all) {
               $this->data = unserialize($all);
           }
       }
serialize() and unserialize are a great way to easily store
PHP data structures on disk.
There’s a lot going on here in very few lines, so I’m going to cover the important bits.
Line 3: This needs to be set to a text file you’d like to use to store your data. We’re not using a database for this project, although you easily could. A simple file will suffice for our needs.
Line 7: The constructor. This is called when we create our object, and immediately stores the ID of the widget.
Line 11: We try to load the text file. If the file doesn’t exist, fine, but on some systems you’ll need to create it ahead of time and give it the proper permissions for PHP to be able to read and write to it.
Line 14: This line is important. It takes the data from the text file – if there is one – and unserializes() it. The file contains a complex PHP array that’s been converted to a plain text representation, via serialize(), allowing us to store it and read it back in as an array later.
Step 6. The get_ratings() Method.
This method is called either on its own, or from the vote() method. It finds the data for a particular widget ID and returns it to the requesting page, in JSON format.
   public function get_ratings() {
       if($this->data[$this->widget_id]) {
           echo json_encode($this->data[$this->widget_id]);
       }
       else {
           $data['widget_id'] = $this->widget_id;
           $data['number_votes'] = 0;
           $data['total_points'] = 0;
           $data['dec_avg'] = 0;
           $data['whole_avg'] = 0;
           echo json_encode($data);
       }
   }
This only looks complicated – it’s actually pretty simple. The first thing we do is check if the array stored in $this->data has a key matching our widget ID. If it does, we just return that information, because that’s the widget data the page was requesting.
We don’t have to do anything to that data because its already in array form. $this->data is just an array of arrays. We encode the array we want with json_encode() and send it back to the browser.
If there’s no data for the widget ID we’ve requested, we create a record with all zero values, and send it back to the browser.
Step 7. The vote() Method
Next, we need to create a method to handle incoming votes. When the method finishes, it has to call get_ratings() to send the updated information back to the web browser.
The Method Start
       public function vote() {
           # Get the value of the vote
           preg_match('/star_([1-5]{1})/', $_POST['clicked_on'], $match);
           $vote = $match[1];
The first thing we do is get the value of the vote. Remember that somewhere in ‘clicked_on’ is a class name in the format of star_#. "star_4", for example. To get that value, we’re using a regular expression and capturing the value of the number to $match[1].
The method Middle
           $ID = $this->widget_id;
           # Update the record if it exists
           if($this->data[$ID]) {
               $this->data[$ID]['number_votes'] += 1;
               $this->data[$ID]['total_points'] += $vote;
           }
           # Create a new one if it does not
           else {
               $this->data[$ID]['number_votes'] = 1;
               $this->data[$ID]['total_points'] = $vote;
           }
Here we store $this->widget_id into $ID for clarity – the following code gets a bit rough on the eyes without it.
We check if information for this ID exists, and, if so, we add a vote to the total vote count, and add the points from the vote received. This is a running total of all votes; so if one person gives five stars, and another, three, that’s eight points total.
If the record doesn’t exist, we create one, with one vote, and just the points from the incoming vote.
Finishing Up
           $this->data[$ID]['dec_avg'] = round( $this->data[$ID]['total_points'] / $this->data[$ID]['number_votes'], 1 );
           $this->data[$ID]['whole_avg'] = round( $this->data[$ID]['dec_avg'] );

           file_put_contents($this->data_file, serialize($this->data));
           $this->get_ratings();
       }
Once we’ve updated the vote and point totals, we have to calculate both the average expressed as a whole number, and to one decimal point. To avoid having to do the math twice, we first calculate the average to one decimal on line one, and then round that off to a whole number, on line two.
On line four, we’re storing the changed information back on disk after processing it with serialize(). Once the data is safely stored away, we call $this->get_ratings() to send the new, updated information to the browser.
Conclusion
For the sake of simplicity, this isn’t a 100% complete solution. To extend this project, we should store a cookie to make sure people only vote once, or even record the IP address. It’s also possible that two first-votes couple happen simultaneously, and only one may be recorded. It is, however, a great start, and is more then suitable for keeping track of votes on a few handfuls of items on your website. Thoughts? Thanks for reading!
2010년 5월 3일 월요일
windows2003 + iis log + awstats-6.8 로그분석기 및 3일이상된 로그 자동지우기
출처: http://blog.naver.com/kikisu11/10038366446
리눅스 로그분석기 webalizer만 쓰다가 리눅스서버를 윈도우 2003으로 옮기면서 그에 해당하는 로그분석기를 찾았으나
생각보다 해당자료를 쉽게 찾아볼수 없었다
우연히 awstats 란 놈을 알게됬으나 대부분 설치가 리눅스 용이었다 그러다 마침 좋은 글을 찾게되어 설치하기로 결정!
참조 사이트 :
http://www.1000dedi.net/hosting/gnuboard4/bbs/board.php?bo_table=serverLecture&wr_id=237
http://blog.naver.com/mijugari?Redirect=Log&logNo=120051328913
http://hbesthee.tistory.com/319
100dedi 는 사장님이 곰아저씨라 불리던 사람이였던거 같은데 잘 되는지 모르겠다
그분들 아직도 열심히 하시는가보다.. 사무실에 한번 찾아간적 있었던거 같은데..쩝
-- 설치과정
1. http://awstats.sourceforge.net에서 윈도우용 awstats(awstats-6.8.exe)를 다운을 받는다
2. http://www.activestate.com 에서 window용 perl을 다운(ActivePerl-5.10.0.1004-MSWin32-x86-287188.msi)을 받는다
3. 다운받은걸(perl) 인스톨한다. ( perl.exe 를 패스로 잡아주던지 system32 폴더안에 넣든지 둘중하나)
--- 여기까진 참조 사이트와 같다.. 이후는 조금 다르다 버전차이인거 같음
4. awstats 인스톨한다 설치과정중에 아무것도 안물어본다.. (급당황-_-)
5. 설치된 디렉토리에서 C:\AWStats\cgi-bin 폴더를 통째로 웹폴더 e:\www 상에 옮긴다.
6. 옮긴 cgi-bin 폴더에서 awstats.model.conf 하나 복사해서 awstats.사이트명.conf 로 변경후 수정
---------------- 수정 내용 -------------------------
LogFile="E:/LogFiles/W3SVC895811793/ex%YY-24%MM-24%DD-24.log"
LogFormat=2
SiteDomain="www.사이트명.co.kr"
DirData="E:/www/weblog/data"
LoadPlugin="timezone +9"
7. IIS 셋팅
- 웹서비스 확장에 Perl 추가
이름:Activeperl 링크: C:\Perl\bin\Perl.exe "%s" %s 속성 : 허용
- 웹단에서 펄 cgi 읽게 해줘야함
IIS셋팅 - 해당웹사이트 - 사이트속성 - 홈디렉토리(탭) - 구성 - 삽입 - 실행파일 C:\Perl\bin\Perl.exe "%s" %s 확장명 .pl
- 로깅형식 맞추기
IIS셋팅 - 해당웹사이트 - 사이트속성 - 웹사이트(탭) - 로깅사용체크 (W3C 확장로그파일형식) -속성버튼 클릭
일정 : 매일 , 파일 명명 및 롤오버 현지 시간 사용
로그디렉토리 해당 디렉토리 설정
-- 고급속성에 들어가 체크해준것들
date,time,c-ip,cs-username,cs-method, cs-uri-stem, sc-status, sc-bytes, cs-version, cs(User-Agent) , csReferer
8. 도스로 들어가서
C:\Perl\bin\perl.exe E:\www\weblog\cgi-bin\awstats.pl -config=사이트명 -update
실행.... 안됨 ㅠ,ㅠ 오류내용(W3C 확장로그파일에 맞추란다)
기존로그를 모두 지우고 iis 에 새로맞춘 로깅형식 데이터를 조금 복사해서 어제날짜로 파일명을 맞춘후 다시 실행!!!
된다~ ㅎㅎㅎ
9. 작업일정 등록
배치파일 생성 (AUTO_LOG_ANALYZER.bat) 명령어 내용
C:\Perl\bin\perl.exe E:\www\weblog\cgi-bin\awstats.pl -config=사이트명 -update
------------------------------------------
10. 매일 쌓이는 iis 로그가 2기가정도 된다 타업체에서 우리사이트 로봇으로 돌려서 데이터를 수집해가는것 같은데
이것저것 작업할게 많아서 수집못하게 설정할 시간이 없다..
우선 로그 관리부터 해야겠다 싶어서 "자동 삭제"로 검색해보니 C#소스만 보였따..
그냥 그 소스 가져다 하나 만들려다 검색명령어를 이리저리 바꿔봤더니 좋은 프로그램이 있다
해당 참조사이트에서 날짜로 자동 삭제하는 프로그램(forfile.exe)을 가져다 썼다..
참고로 forfile.exe 은 윈도우2003에서 기본제공이라는데 명령어가 안먹혀서 인터넷 가서 다운 받아서 system32 폴더에 저장했음
11. 배치파일 생성 (AUTO_LOG_DELETE.bat) 명령어 내용
C:\WINDOWS\system32\forfile /p "E:\LogFiles\W3SVC895811793" /M *.* /D -3 /C "cmd /C del @path"
-- 이상 --
다음날 확인해봤더니 로그가 안쌓였다.. 이런..
오류내용 역시 W3C 확장로그파일에 맞추란다 - 하지만 원인은 이게 아니엿음....
테스트로 로그를 열어서 2000여줄로 줄여서 날렸다.. 잘된다.. 헉!! 무료가 아닌가???
기존 생성된데이터를 모두 지우고 테스트했더니 2기가도 잘 된다...
원인은 어제 테스트한 로그의 날짜가 12월 2일이였고 오늘 새벽에 쌓을려고 하는 로그도 12월 2일이였다.. 모두 지우고
다시 시작했더니 3일간 잘 쌓이고 있다...
[출처] windows2003 + iis log + awstats-6.8 로그분석기 및 3일이상된 로그 자동지우기
작성자 장돌뱅이
피드 구독하기:
글 (Atom)